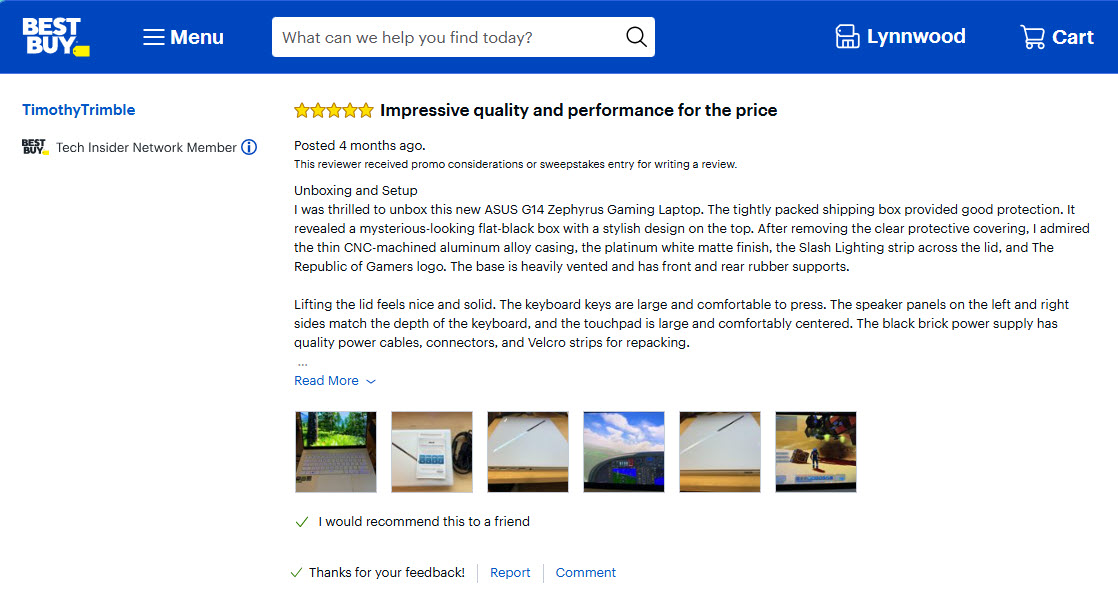
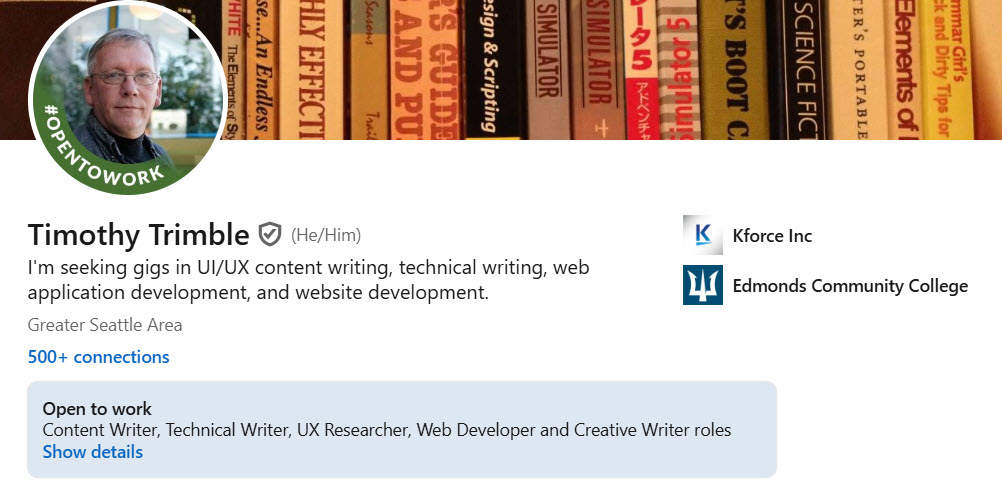
Since 2018, I have been writing product reviews for Best Buy. I was surprised when they emailed me and asked if I wanted to be a Tech Insider. I assumed they discovered I was a Best Buy customer, a published writer, and that my social media network had over 8,000 followers.
My very first review was for a Dell Inspiron 3670 desktop computer system. Since then, I have written over 100 reviews about computers, home appliances, TVs, cameras, computer accessories, and even about a drone.
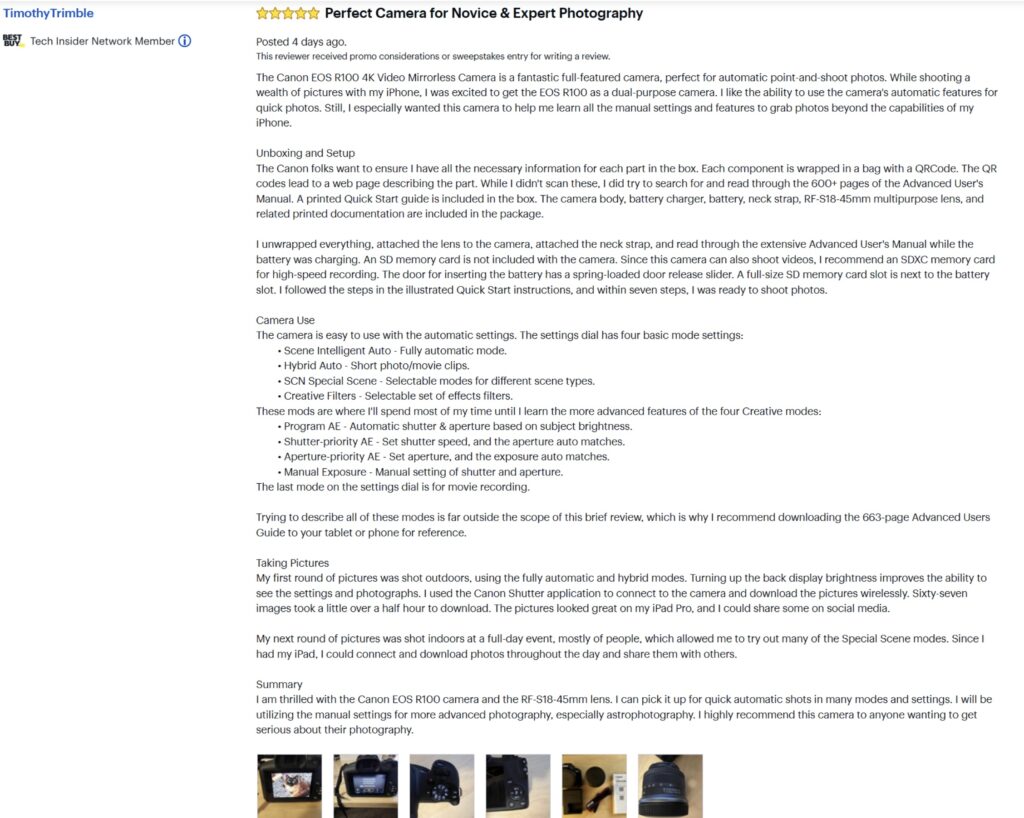
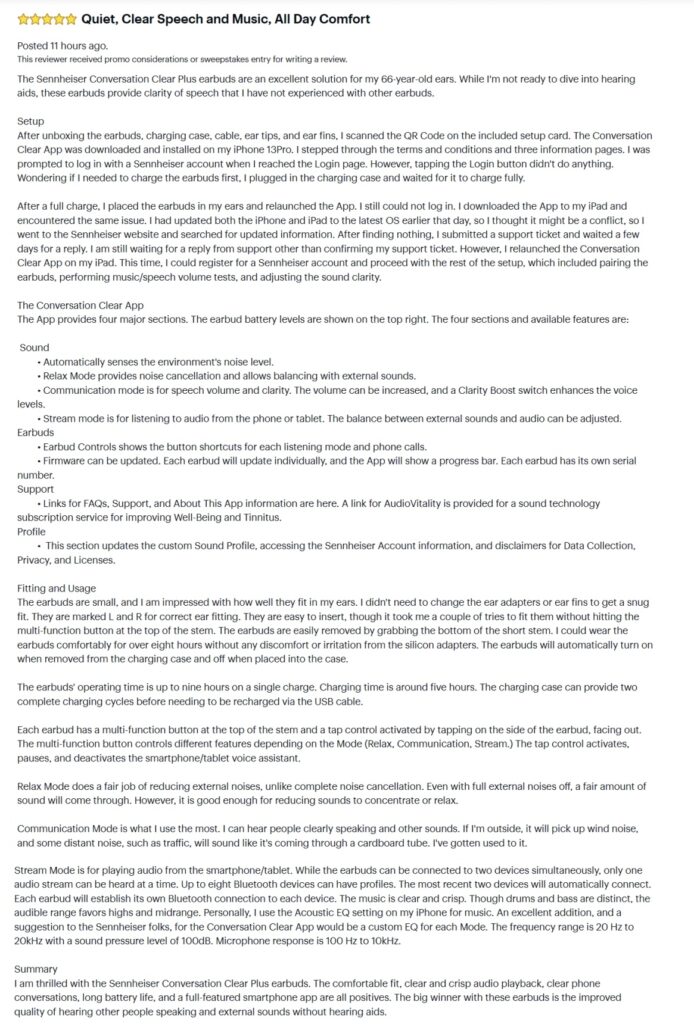
These reviews are aimed at the general consumer market, and thus, I present an informative, positive, and fair voice without getting into so many details that the reader is overwhelmed. Most of my reviews are in the four and five-star range. Do I ever present a bad review? Absolutely. While a bad review does not help Best Buy sell products, I feel I have to be honest as a writer. In one of my reviews, I gave an automobile dash cam two stars since it had a lot of issues and wasn’t ready for production release. I even worked with their tech support to try and resolve the problems, but they did not have a resolution. And yes, my contact at Best Buy was not happy about it. However, as a reseller, their reputation is also on the line.
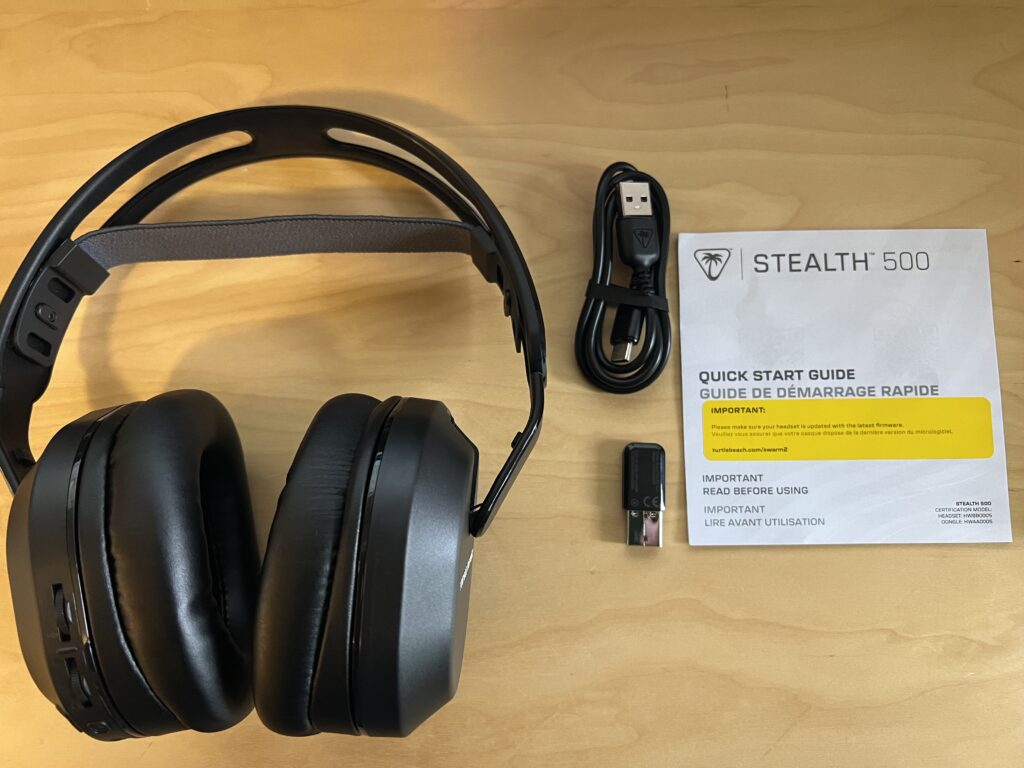
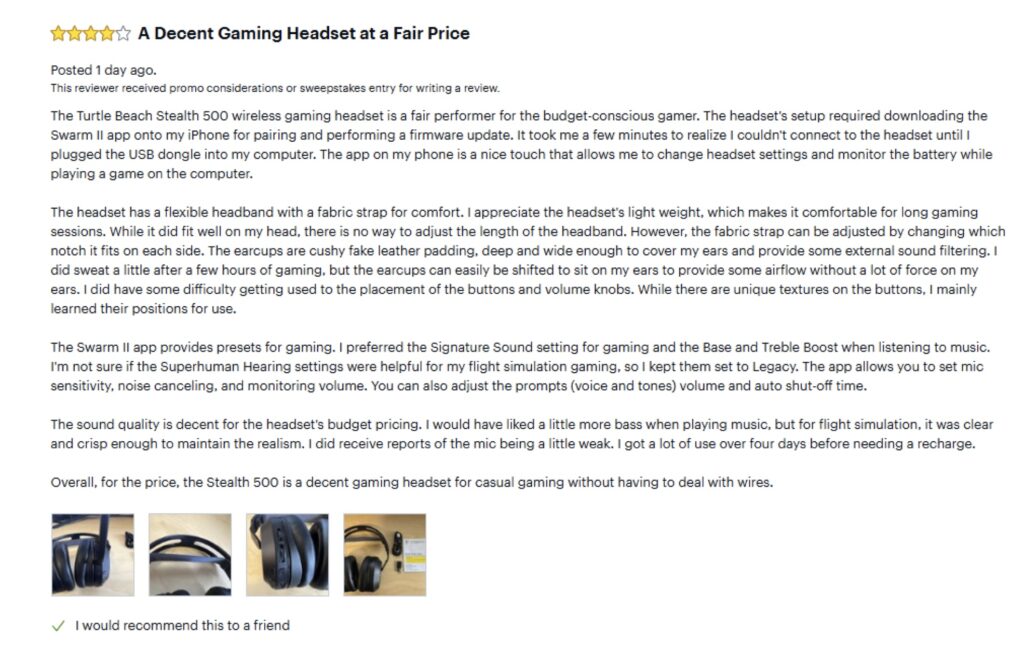
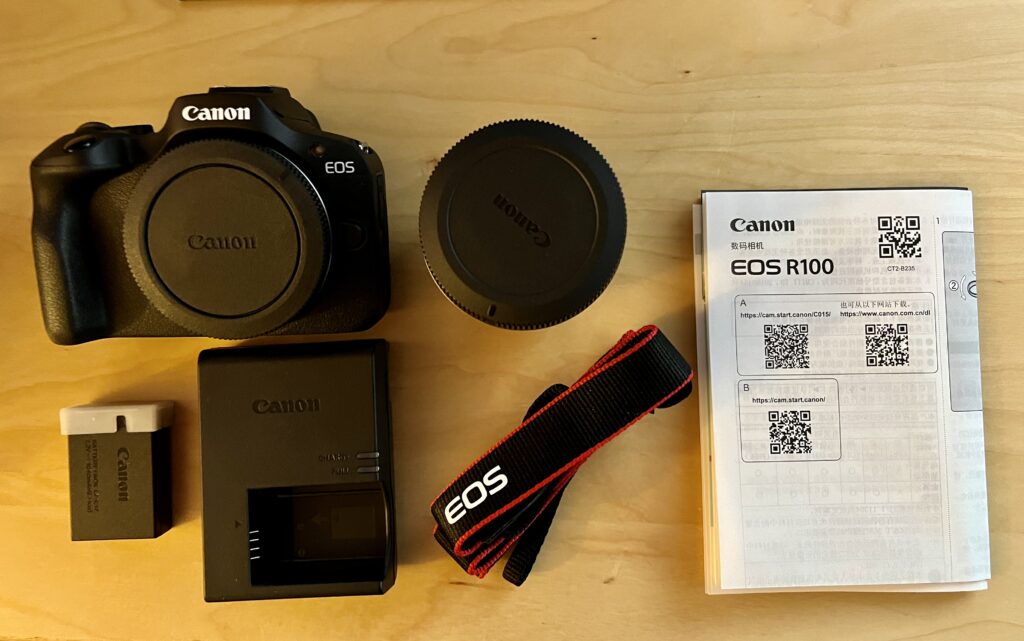
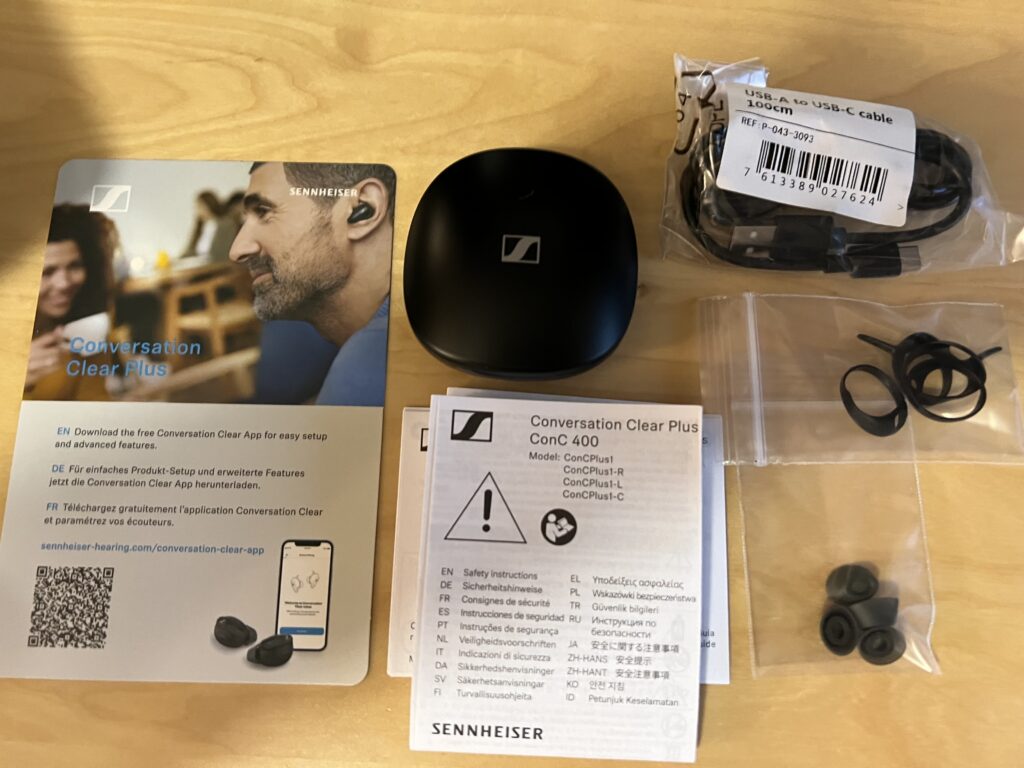
Here are a few examples of my reviews:
The Turtle Beach Stealth 500 Wireless Gaming Headset
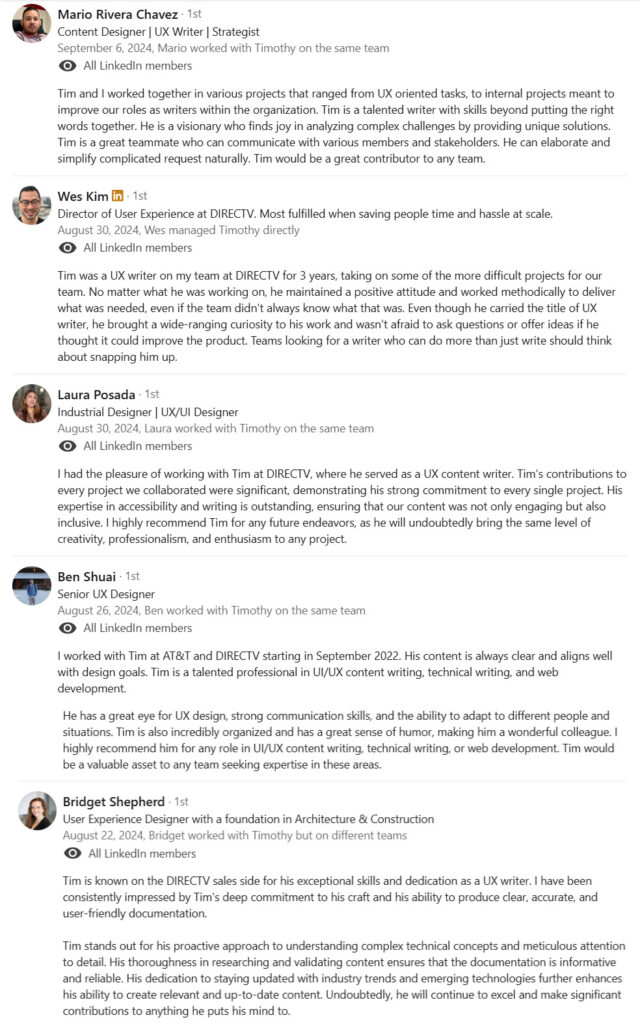
I had the privilege of working with some fantastic people at DIRECTV. Many of them were kind enough to post recommendations on LinkedIn. Thank you for the kind words.
One-Year Kforce Contract Turns Into Three-and-a-half
Within days of turning on the “Available for work” banner on my LinkedIn page, I received a note from a recruiter with Kforce asking if I would be interested in a one-year content writer contract with DIRECTV. Without hesitation, I responded positively. The rep sent me the job description, and I sent my resume. The next day, I had a video interview with the Director of UX. It was an excellent interview, and I was pretty upfront about my views of AT&T (who currently owned DIRECTV) even though DIRECTV was splitting off as their own company. I didn’t think I would get the job. The next day I had the job and the onboarding process began.
What’s a Content Writer?
Generally, I knew I would be responsible for writing and editing copy for the website. But as I dove into the assignment, many light bulbs came on. I soon discovered I had been a “content writer” most of my life. I wince whenever I see a poorly written sign, advertisement, news header, or instructions – wanting to fix it. Now, it was my responsibility to quit wincing and start fixing.
DTV Business Writer and Producer
For the first five months, I was assigned to help DTV Business with content for a site refresh. DTV Business caters to Restaurants, Hotels, Offices, and more. We worked with a vendor to provide the media graphics; our designer would build the UI for the pages, and I would provide the written content. I created a new MS Word document as a CRD, a Content Requirements Document. I would match a CRD with the designer’s Adobe XD design document. These would be reviewed, approved, and handed over to the developers. But there was a bit of a problem. We didn’t have a Producer assigned to the team to coordinate the assigned content and media movement. With agreement from my director, I assumed the role of Producer and Content Writer. There were a couple of long weekends, but we completed the business site refresh.
Upper Funnel and Buy Flow Content
My following content writing assignments were for various teams and content, mainly for the new customer product selection and purchasing processes. It is incredible how often content has to be changed when dealing with websites that sell products and services. Many of those changes also require approval from the legal department. Product names, logos, trademarks, styling, and element grouping must be just right.
The Skunkworks
My assignment was with the Quadro team for most of the last two years of the contract. I feel pretty privileged to have been selected to be on this team. We referred to ourselves as the “Skunkworks” of DIRECTV. Our job was to develop new ideas and website components to drive traffic to the site and have better engagement with potential customers. And we didn’t follow the usual business processes. The team’s principal product manager would give us an idea of what he hoped to accomplish. We would have the entire team involved in a meeting. The manager, product owner, designer, writer, and development team will all be involved in discussing and determining feasibility.
Now, due to my extensive background as a developer, I slipped into the role of analyst. I would research the best approach, design, and content for the best results. I would then mock up some options and present them to the team. The PM would make a selection, and then we would hand it over to the designer. Once the design was completed and accepted, we would hand it over to the developers, who already had a head start since they were involved from the beginning of the request. This level of communication and involvement allowed us to provide solutions quickly.
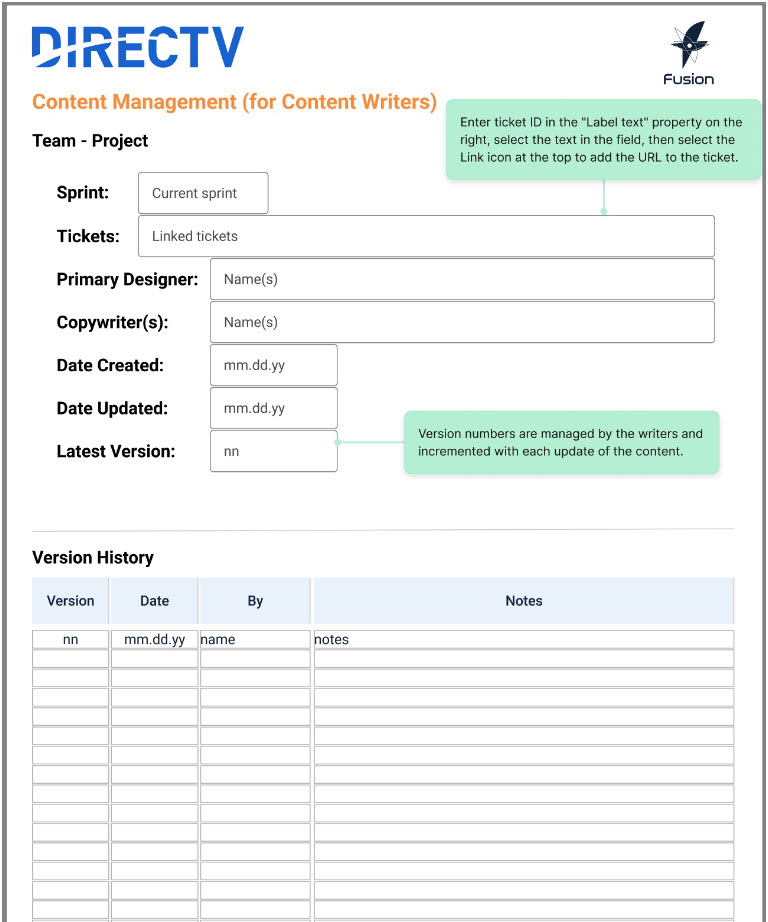
Quiz Flow component created by the Quadro Team.
Fusion Design System and Migration to Figma
One of the first questions I asked when I started with DIRECTV was if there was a Style Guide. I knew from my courses at Edmonds College that a style guide would be necessary to provide efficient and effective website content. The answer was, “Well, kind of…” There were font guides, color guides, a sort-of element guide, and an attempt at a content voice. But these were scattered about in different files and tribal knowledge.
The director who hired me was now a VP, and he asked for feedback from the team before attending an off-site strategic planning meeting. I mentioned how a Style Guide would be helpful, and I’m sure others noted the need for a Design System.
During the past two years, we migrated to Figma. The new Fusion Design Team has been busy designing and building atoms, molecules, elements, and components for the Fusion Design Library (based on Material UI.) I had the privilege of writing content for the Sharepoint-based Fusion Design Style Guide and content for the Fusion Design Library, and I recorded multiple training videos on how to use Figma, the Fusion Design Library, and how to integrate the Microsoft Visual Studio Code extension for Figma, for the developers. As my last parting project, I designed and developed a CRD template for Figma, which shows how to manage the copy content within the Figma design files.
Image of the CRD Template in Figma. (Image only. I do not possess the file. Property of DIRECTV.)
Project Summary
While I am sad to part ways with the DIRECTV team, I am very pleased that this contract lasted much longer than one year. My skills in UX content writing and research have been greatly expanded. I’ve learned how to do some design and prototyping in Figma and improved my video recording and editing processes. But mostly, I have met and made new friends in the UX/UI industry. Thank you, Kforce and DIRECTV, for the incredible time.
From Bricks to Clicks! – City Lights SF Shopify Project.
Last December (2020) a friend, past work associate, and fellow author, McNall got in touch with me and asked if I had any Shopify experience. Truthfully, I responded that I had an account, had done some minor store configuration with it, and that it was just another CMS (Content Management System) on the web. Little did I know that I would soon be the primary developer on a major, push the boundaries of Shopify project.
I soon met the team of J.R. (PM), Whitney (UX), McNall (Content), Mike (Configuration), and Carolyn (Client) via a Zoom meeting and learned the initial scope of the project.
Project Scope
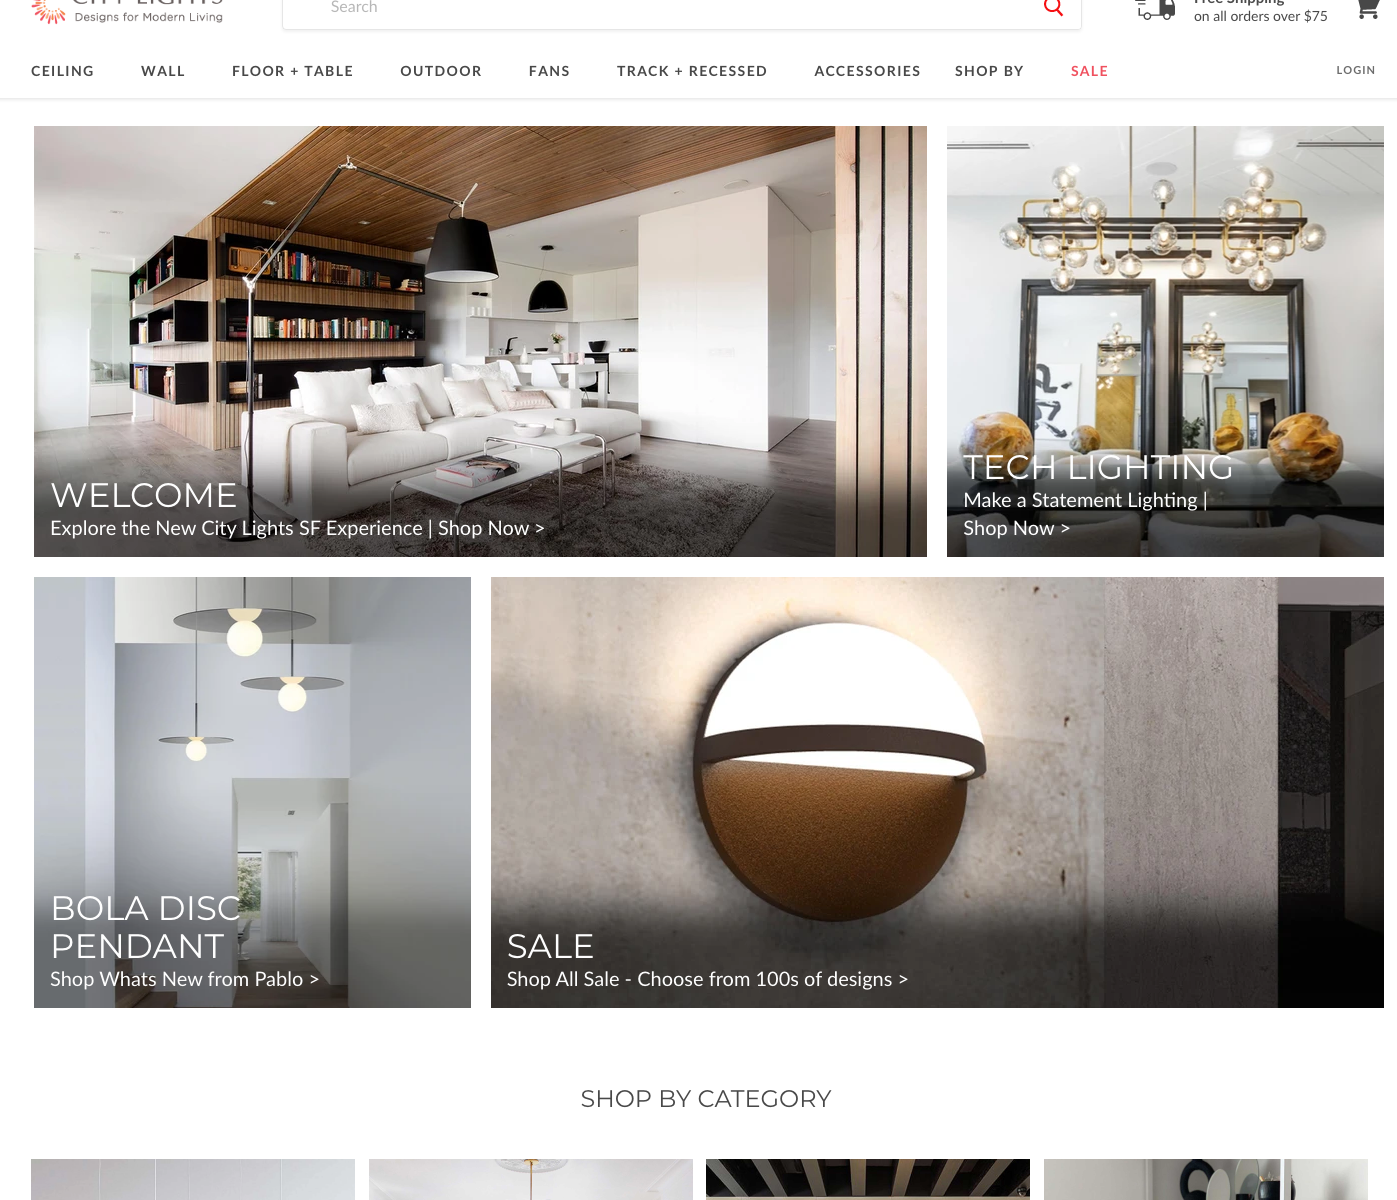
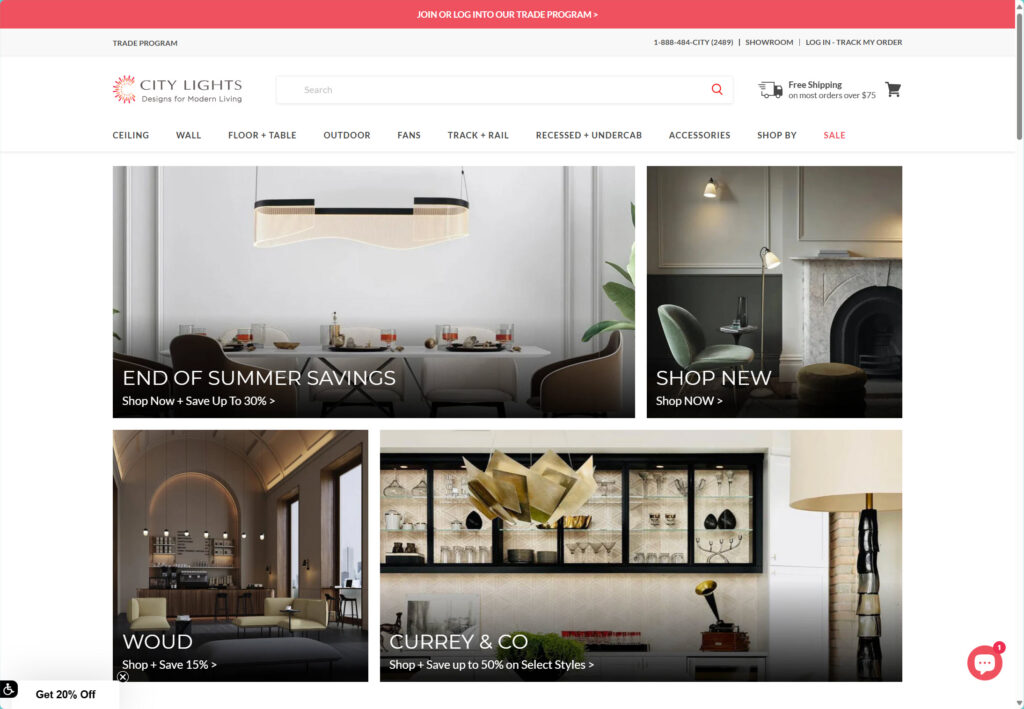
City Lights SF Lighting is an upscale lighting store in the City Lights district of San Francisco. Like many other businesses in a pandemic-stricken world, they had to close their brick-and-mortar-based business operation. They had an excellent website, but it was only for attracting visitors to the physical store location. Our challenge was to create an online storefront for a catalog with tens of thousands of products and have it up and running by the end of April 2021. No pressure!
It had already been decided that Shopify would be the store’s platform. We were at the very beginning of a significant project. We only had a platform, a live date, and a team. Thankfully, the team was impressive. We defined our key goals:
Pick a theme for the UI/UX.
Determine how to import tens of thousands of products.
With the theme as a foundation, design the required pages.
Define the menu structure.
We all dove in feet first to our specific tasks. My initial responsibility was to help define the menu structure and determine how to get the products into the store database.
The Shopify Environment
Fortunately, I’m a speedy student willing to take on anything new. Even though Shopify is just another CMS, it does have its own structure, terminology, and development language. Shopify has a prebuilt database structure for supporting products. Products can have descriptions, pictures, options (variants), types, attributes (dimensions, weight, barcode, vendor, etc.), and tags can be defined and attached. Shopify also has Collections, which is a grouping of products. The grouping can be by vendor, types, tags, and just about any relationship that one can think of.
The themes have a slightly different structure—nothing like WordPress, Wix, or Square. Home pages have a bunch of different dynamic sections, while other pages are pretty static. Most themes are designed for a specific type of product or industry and with the intent that everything you need is already provided. A Pages section provides the ability to build custom pages with a Real-Time Editor or toggle to the source and use HTML.
The programming environment is based on the Liquid template language and allows users to customize the existing theme files or add new pages, sections, functions, and styling. HTML, CSS, Javascript, JSON, and AJAX are all supported.
The Theme and Apps (Plug-ins)
The Shopify sales representative, Philip, was very helpful in directing us to the themes and apps that would best meet our needs. After much discussion and some research, we landed on the following:
Empire theme by Pixel Union – the UI/UX layout
Tabs – Product Page Tabs – for putting tabs on the product description
Matrixify (Excelify) – For importing and exporting data
Product Reviews – To get and show product reviews.
Product Filter & Search – Provides expanded search and filtering
Instafeed – To show the client’s Instagram feed
GDPR/CCPA + Cookie Management
Shopify Email – For email notifications
Accessibility Assistant – To ease website use for those with disabilities
Variant Image Automator – For displaying images of variant options
Variant Options Swatch King – Additional swatch image options
Yes, those are a lot of plugins, but they are quite necessary for a full-blown shopping experience and presence.
Product Data
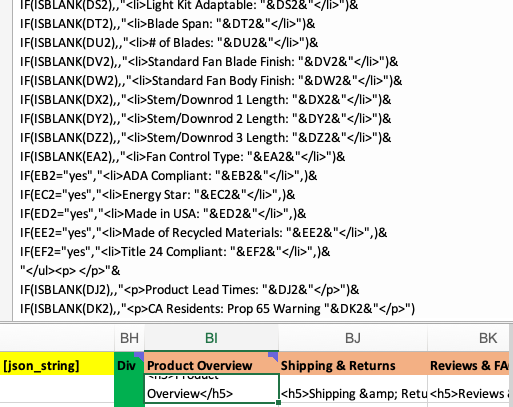
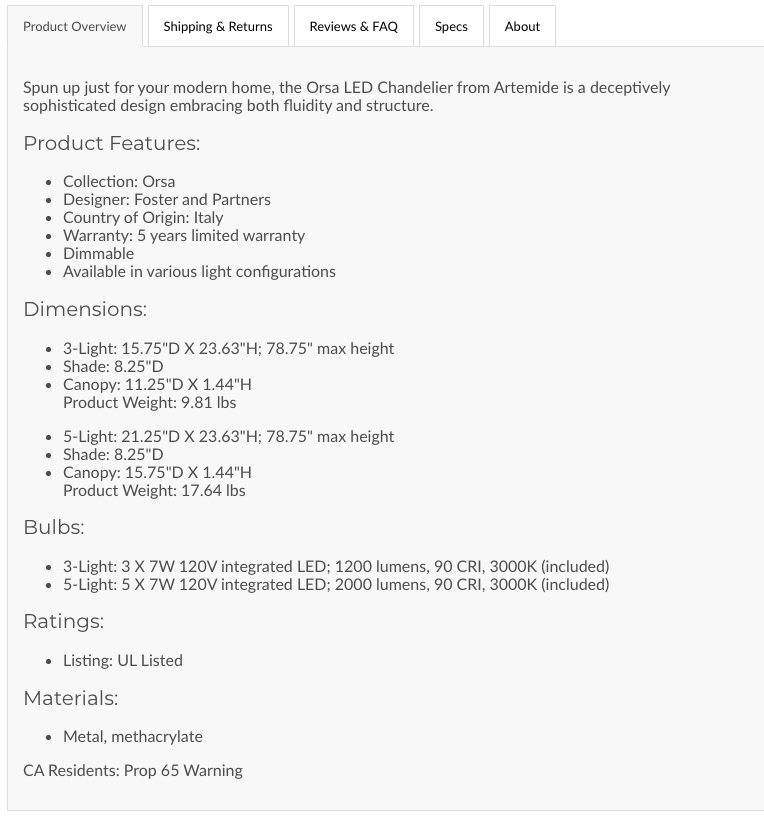
My first development task was actually in Microsoft Excel. We use the Matrixify app to import the products into the store. The product description can be formatted with HTML for an excellent presentation. We have a lot of information to present about the product and will divide that information into tabs. So, it was necessary to add columns to the importing spreadsheet with HTML code to gather the data from other columns, format it, and then have the product description column reference the columns with the code. It was a lot of work to get it right, but it worked pretty nicely. We provide the spreadsheet to a third party who adds the product data to the spreadsheet, and the code in the columns automatically handles the formatting.
Some of the Excel code.What the Excel code generates. The Product Description.
Theme Challenges
As is usually the case with most CMS-based websites, the theme does not always meet the client’s needs. This was the case with this project. While the Empire theme is very robust, a lot of functionality was needed to make it into the required storefront. Here are some of the customizations and the associated challenges I ran into:
Category Pages: The site needed to add pages to show specific lighting categories, such as outdoor, track lighting, etc. The Category Pages needed to have Sub-categories. Unfortunately, Shopify does not allow the embedding of sub-collections under a collection. Initially, I built these in the Pages section in HTML and inline CSS. Upon discovering that these pages would need to be changed by the client regularly, I moved the code into Liquid and added JSON fields to expose the settings to the UI for easy customization. Then, the challenge was adding calculations to determine how many rows and sub-categories are on the page and then adjusting the page length to compensate.
Home Page HTML Section: Adding a section to the home page with HTML and inline CSS is a nice feature. We added an “About Us” section with an image, some text, and a button. It works, but the only way to change the content is to edit the source code in the box.
Dynamic vs. Designated Collection Pages: The Empire theme has a nice feature that allows a customer to click on a product’s vendor name and a Collection Page for that vendor will be dynamically generated. However, we wanted that link to go to the collection page we manually created, with a description and a banner image. This required diving into the Liquid code for the Collection page and changing the vendor link to point to our manually created collection pages.
End of Contract
Unfortunately, as is sometimes the case with website implementation projects, they don’t always go according to schedule. In this case, with a planned completion of April, I had put my feelers out for new projects via LinkedIn. I didn’t expect any immediate hits. However, Kforce contacted me about an opportunity with DIRECTV for a one-year contract. I landed the gig and spent the next two weeks helping City Lights hire another Shopify developer. The good news is that City Lights and the team completed the project, and the new website is doing great. You can read about my DIRECTV experience in the next posting.
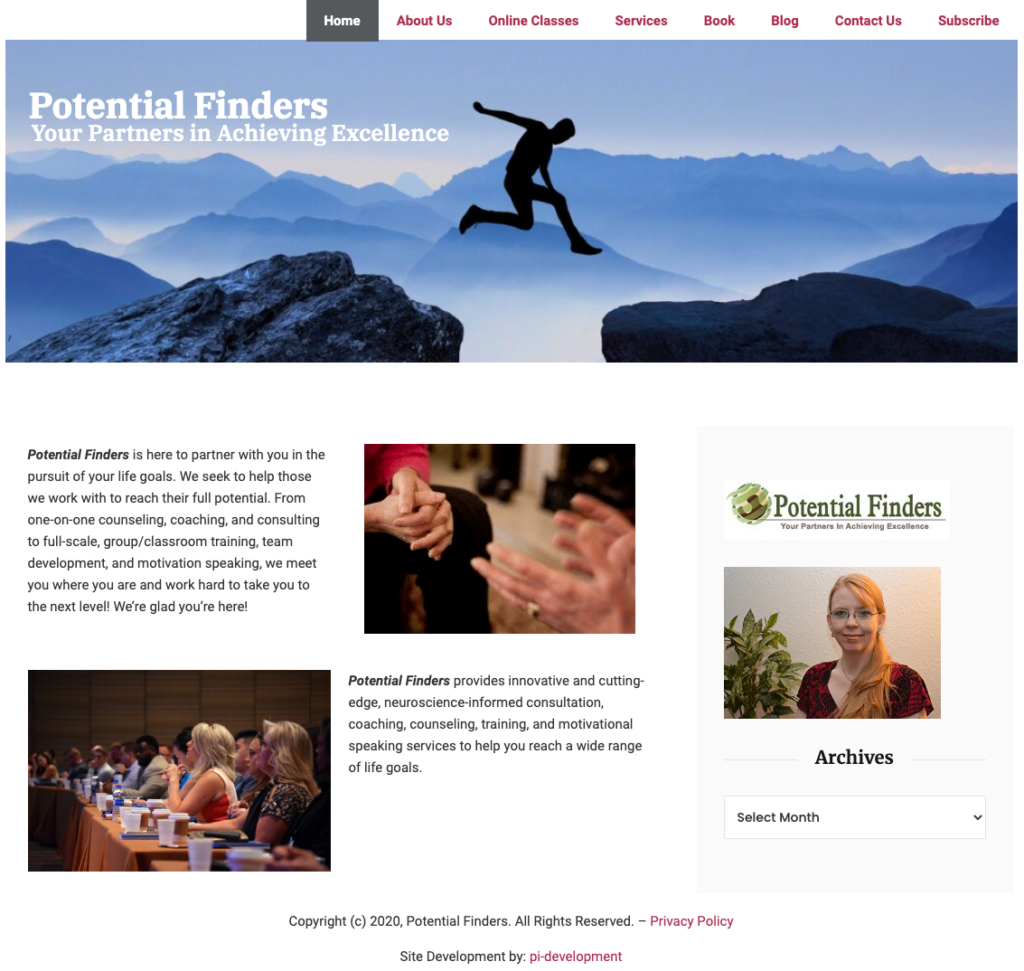
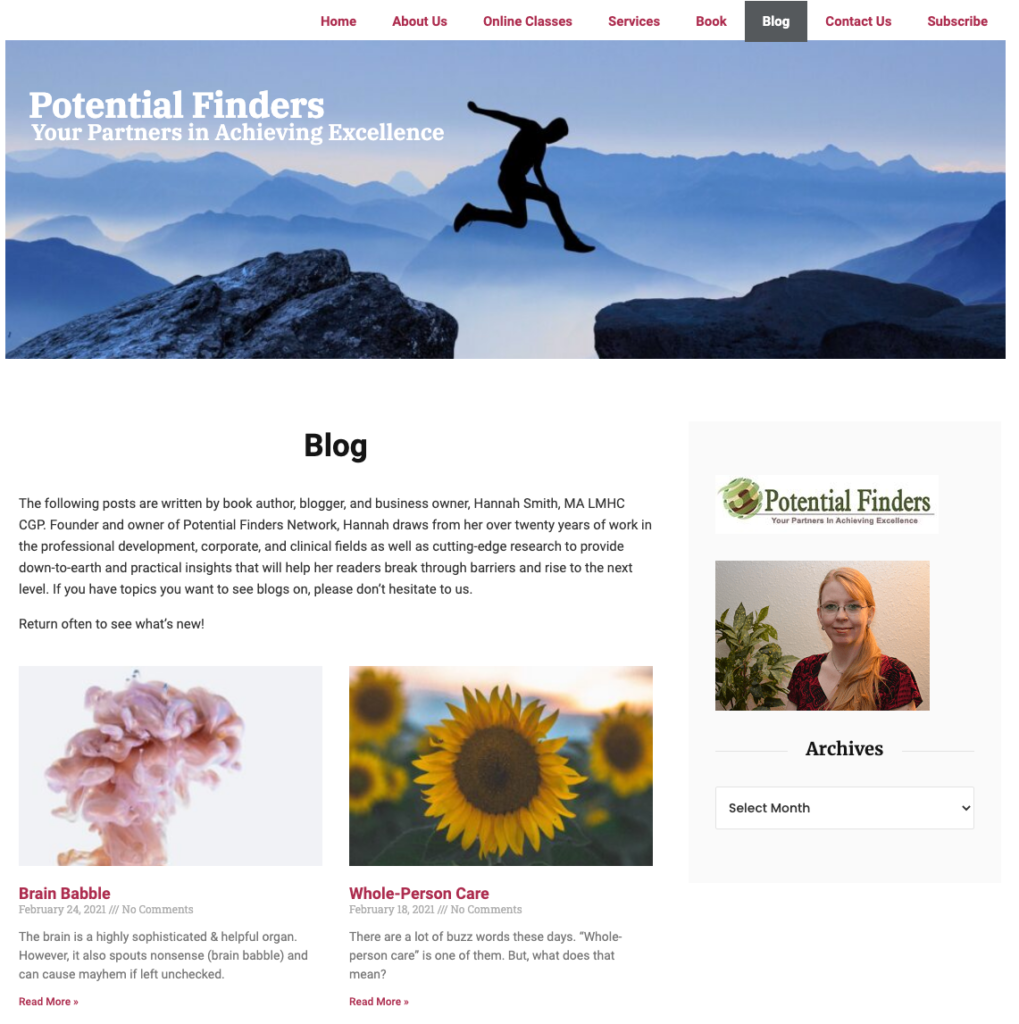
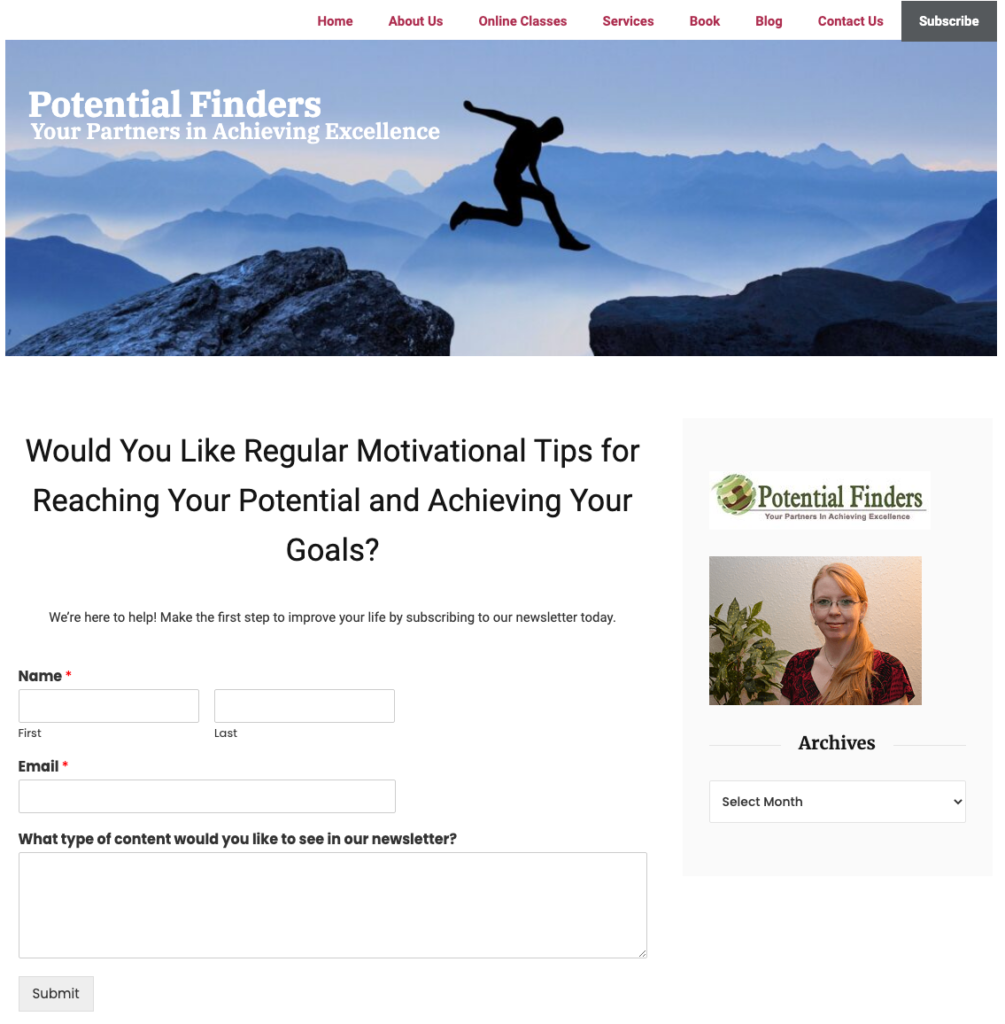
Last year, I had the privilege of meeting Hanna Smith, MA LMHC CGP. She had an interesting dilemma of being locked into a very limited WordPress-based hosting platform. She wanted to expand the functionality of her site and was told the features were not available. I presented her with an affordable solution which included:
Moved the hosting to a flexible WordPress-based platform.
Redesigned the UI and Menu structure.
Added all of her blog posts and provided video training to her content manager.
Implemented spam protection, contact form, subscription form, SEO support, and Mailchimp integration.
Provided custom CSS and code change for content formatting.
Added her Book page.
Conversion of her paper fillable forms to downloadable PDF electronic fillable forms.
I manage the site backups and plugin upgrades.
Primed for Long-term Growth
I am very pleased with how the site has turned out and to see how happy Hanna is with the progress. She now has the flexibility to dream up new features and functionality for her site and thus gain more exposure for her services and products.
Soon, I will be integrating a courseware platform for hosting training videos and content.
A very special thanks to Hanna, for being one of my first website customers and trusting me with her site.
Potential Finders Blog PagePotential Finders Subscription Page
I am very pleased with how this Finals project for my semester of Graphic Arts turned out. The assignment was to build a twelve-page style guide with the following elements:
Cover Page
Student Profile
Table of Contents
Company Overview
Company Statement
Brand Identity Logo
Logo Use Guidelines
Company Voice and Personality
Poster Design
Company Templates for Business Card
A Sample Company Form
A Creative Back Page
While this was supposed to be for an imaginary business, I decided to base this on a business and website idea I came up with several years ago. In fact, I took advantage of this course, to focus on defining the voice and brand for the business.
Critical Event Planning And Recovery Style Guide
Feel free to download and examine this PDF file. All I ask is please do not steal my plan for this business. I am in the process of creating the website and building the web-based application to drive it. I’ll be covering my progress in my blog postings on this site.
Click the logo to download the Style Guide.
Lessons Learned?
This course taught me a lot about the process of creative graphic design. It made me step outside of my normal comfort zone and it taught me a lot about styles, trends, and appeal. I have always been a very curious person and I love learning new things. In order to be a good full-stack web developer, I truly believe it is necessary to have a fundamental grasp of graphic design. I have also learned that as is the same with writing code if you try to cut corners to save time, it will show. In code, it shows in the amount of debugging and fixes required to fix the code. In graphic design, it becomes very visible to the eye.
Can you see where I got a little sloppy trying to save some time?
On the second page, bottom right corner, I added my signature initials – a brand mark that I use on all my blog postings. Well, the graphic was initially designed for black on white. In order to get it to match the scheme of the page, I added a green background. I ran out of time and left it the way it turned out. Unfortunately, the residual white aliasing can still be seen and it makes it look sloppy. And yes, I got dinged by the instructor. If I had spent an extra half-hour on it, it would have looked a lot better. While the entire magazine turned out quite well, for me, that little issue is like putting a black dot in the middle of a white page. 😉 And yes, I will be fixing that issue before I turn this into an official style guide for the business.
Feel free to comment on this and let me know what you think about the CEPAR Style Guide. And look for my soon-to-be posted blog entry about my progress with the CEPAR website and development of this new business.
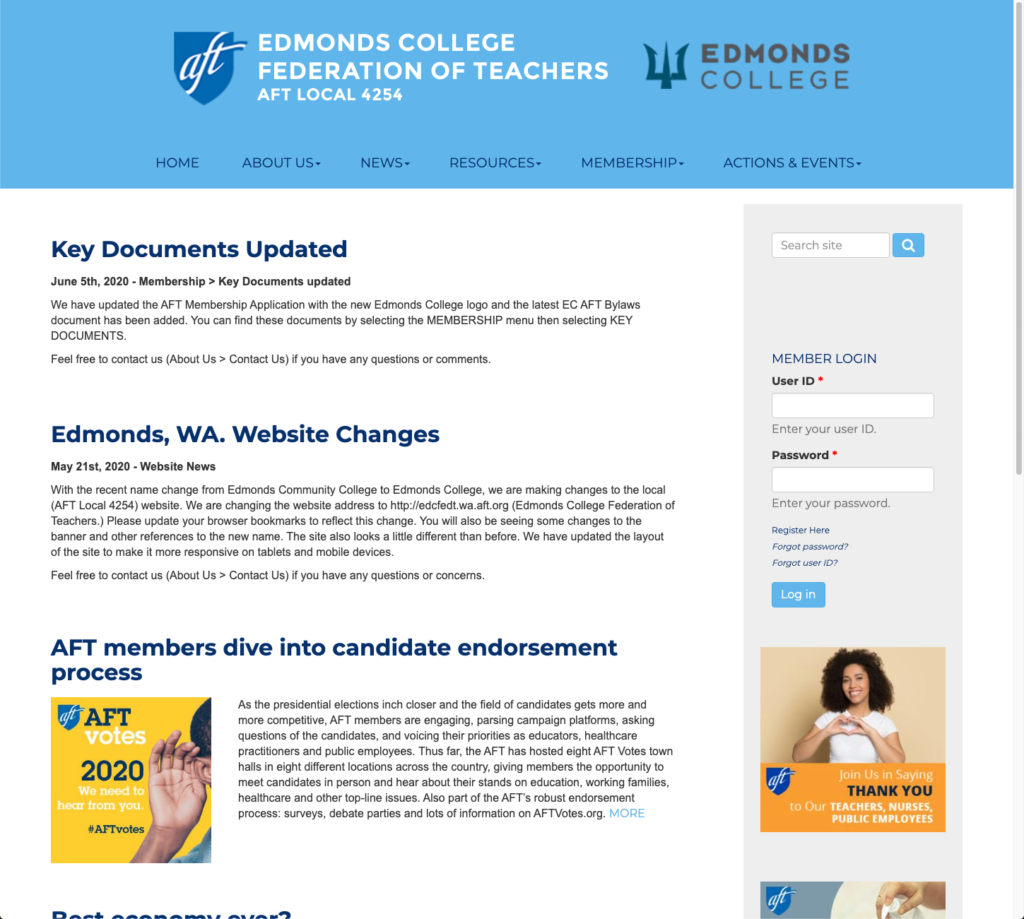
During my last semester at Edmonds College, for my Web Application Developer Certificate program, I had the privilege of obtaining an internship with the Edmonds College Federation of Teachers. Edmonds College had just changed its name from Edmonds Community College and the web site had not been updated in quite a while.
The site is an interesting configuration and is actually governed by the American Federation of Teachers. It is a CMS based site similar to WordPress.
During my internship I performed the following tasks:
Performed a review of the site by examining the elements with Chrome Developer Tools.
Conducted an SEO analysis, keyword analysis, and a site audit with Lighthouse. Compiled and submitted an audit report.
Got up to speed on the Administration features of the site.
Retrieved the site graphics, created a new logo design for the top banner.
Updated site content and articles to reflect the name change from Edmonds Community College to Edmonds College.
Changed the subdomain name of the site from edccft to edcfedt. Updated the menus and navigation to reflect the new URL. QA testing of the entire site to make sure the links and navigation are working.
Updated links in existing articles and posts to the new subdomain.
Edited PDF documents to reflect the new name and links.
Added new logos to PDF documents.
Added new documents and content to the site.
I greatly enjoyed this internship. I learned a lot, got to work with some awesome people, and was able to deliver a successful website refresh. And I get to continue as the site webmaster on an as-needed basis.
Many thanks to Kay Latimer, Steve Hailey, and Professor Louis Ho on the Edmonds team. And thanks to Rachel Anderson and Barbara Tobias with aft.org.
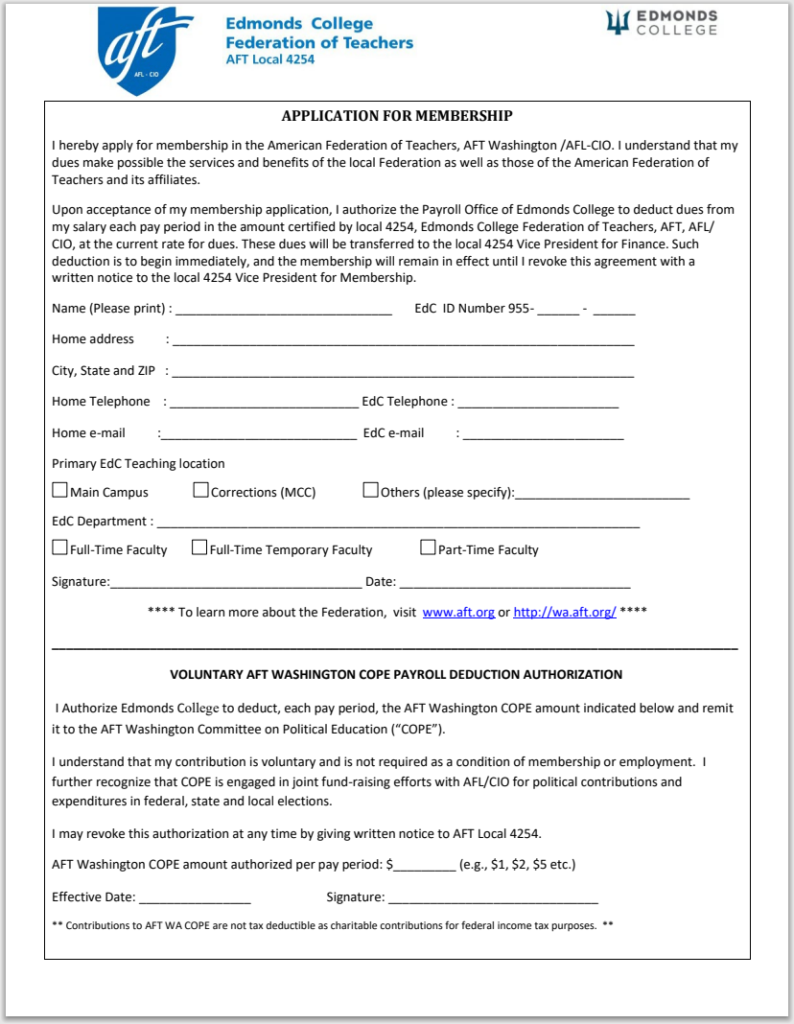
This is the AFT Application PDF after the refresh and logo changes.
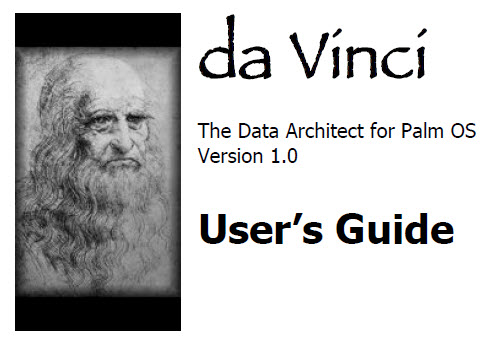
From 1998 to 2002 I ran a small software development company called ETS, Inc. (Extended Technology Systems,) that specialized in custom software and consumer software for handheld platforms (Apple Newton, PalmOS, WindowsCE, etc.) We were doing a lot of PalmOS development in the C language and we decided to develop a tool for designing databases and API code for PalmOS. The product was called, “da Vinci” and we needed a User’s Guide. Even though I was the CEO of a small ten-person company, I was also the only writer on the team. So, I took on the task of producing the User’s Guide.
What happened to ETS, Inc.? This was an exciting and booming business from 1998 through 2001. However, the event of 9/11 had a major impact on the market. The day before 9/11 I was turning away business since I didn’t have the resources. After 9/11 the phone stopped ringing. Our existing clients tightened their budgets and quit spending. We almost had a bundling deal with Metrowerks, but they were impacted too, and quit spending. I poured my savings into the business throughout 2002 and eventually closed our doors in September of 2002. Many good lessons were learned and it was a good run while it lasted.
Target Reader
The target market for da Vinci was PalmOS developers. Almost all of the PalmOS developers at the time were using Metrowerks CodeWarrior for writing and compiling C code for Palm applications. We designed da Vinci to work with the CodeWarrior environment.
Document Layout
As with any software application guide, especially one for developers, I focused on these major topics:
What It Is.
Getting Started.
Tutorial.
How to Use the Application.
API Guide.
How to Get Help.
The guide needed to be easy to read, have visual cues and screenshots, and easy to follow steps. And the API section needed to clearly define each command, command structure, parameters, expected results, and related notes.
The Guide
Cover image for the User’s Guide. (Click to download the PDF.)
The entire guide, as a PDF file, is available here for downloading and review. Even though this was written back in 2002, it is a good example of my technical writing experience as it relates to programming and API guides.
An Example of My Process for Technical Documentation
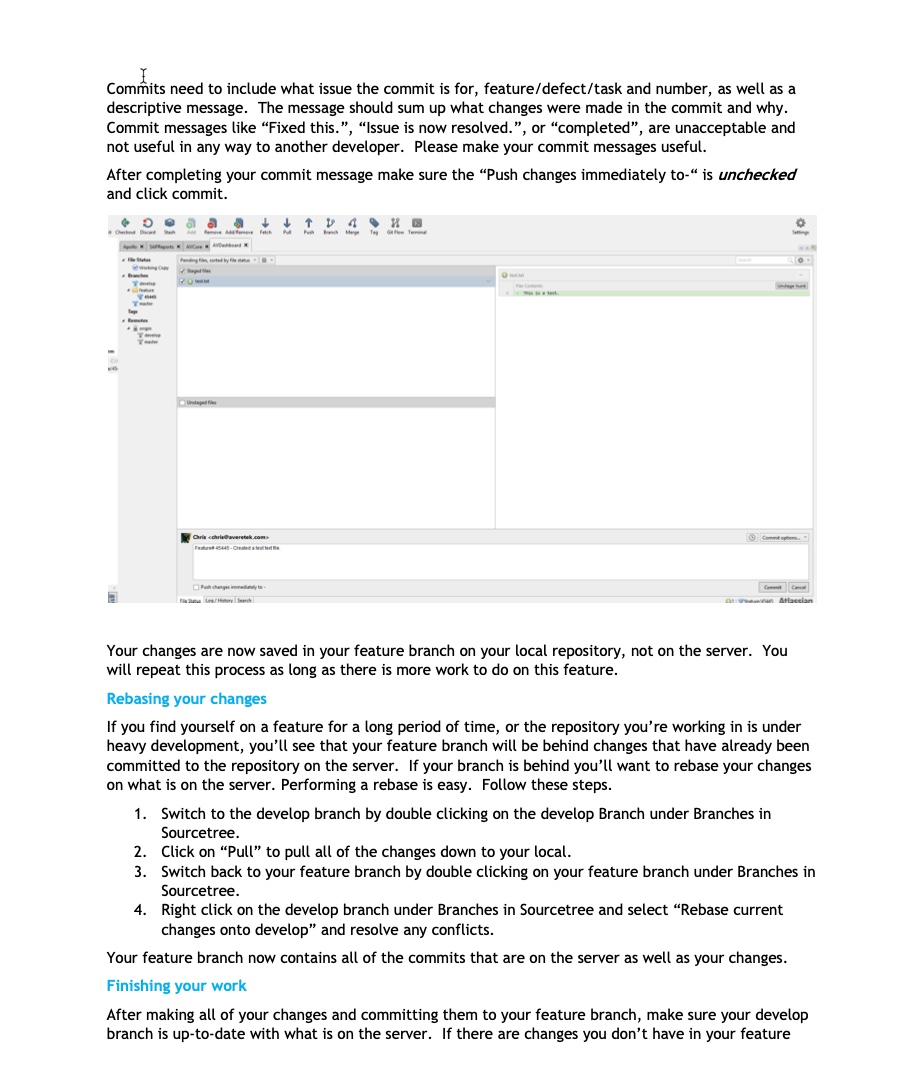
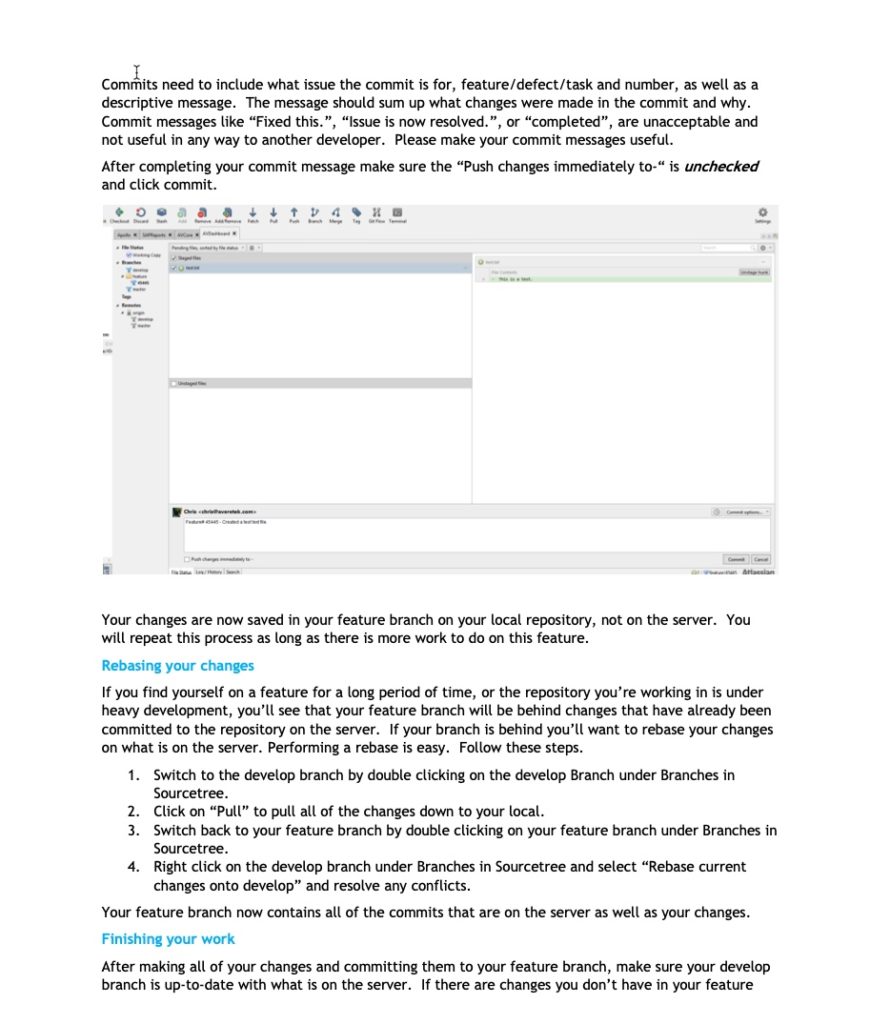
A page from the Git Setup and Usage Guide
Project
One of my roles at Averetek, Inc. (Now e2Open.com) was to provide internal technical documentation. The development team had been using Microsoft’s Sourcesafe and continued to run into difficulties. The decision was made to move all of our source code to Git and to use Atlassian’s SourceTree as the User Interface. Since this migration required a bit of a learning curve for existing and new developers, some documentation was needed. I was tasked with putting together a guide for using Git with our environment.
The Challenge
Due to the complexities of our development, sandbox, and production environment, combined with maintaining multiple code branches for multiple clients – this was not an easy transition to execute. It required very specific steps. At the time of this assignment, I was providing assistance with DevOps and I had a good grasp of the development systems and the process for pushing our code through the different environments.
My Approach
While outlining and writing this guide, there were some key items I had to keep in mind:
The target readers are developers. They are smart and they can quickly grasp the technologies being introduced.
Developers really don’t like to read a lot of documentation. They want to get through it and get on with writing code.
Pictures and Steps are good. The best approach to showing someone how to do something when you can’t be physically there is to give them a picture (or a brief video) of how to do it and provide specific and individual steps.
What if considerations. When writing an instruction guide the author needs to think about the “what if” questions that might come up. What if the developer does not have the correct permissions to see the source code? What if the screenshot in the guide does not match what the developer sees?
Test the Writing
One of the things I quickly learned when writing “Adventures in Flight Simulator” is to always, always, always test the steps and instructions after writing. I had a wonderful technical editor assigned to that project and he was great at following my steps and then highlighting something I missed. Not only do I try to test my writing, but I also verbally read it out loud to make sure it sounds correct.
Completion
While I am not able to share the entire document here, I wanted to write a post about it, and to highlight the things that need to be considered when writing technical documentation. It was a fun and geeky project for me. I felt a sense of accomplishment when the developers were using my guide to get them through the migration and back to their assigned tasks.
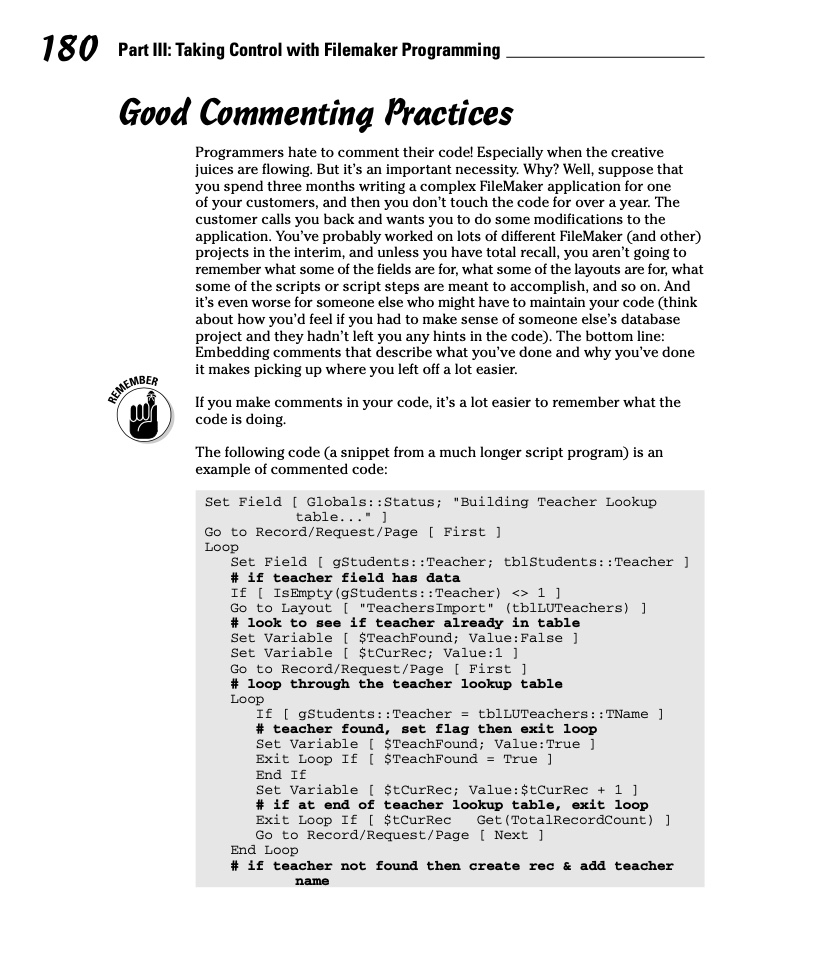
In 2005-2006 I had the privilege of writing a book for Wiley Publications. The FileMaker Pro Design & Scripting for Dummies book. As a FileMaker developer, I had wanted a book with some significant technical meat. At the time, the only books on FileMaker were at the introductory level. When I would speak to people about FileMaker development, they thought the product was a quick-and-easy form and table builder, without realizing the true power of the environment. I wrote up a proposal and contacted my agent and asked if she could pitch the idea. She couldn’t find anyone willing to publish a book at that level, however, she said the Wiley folks would be interested in a Dummies Guide. While this was exciting, I didn’t want to do another introductory book. So, I pitched the idea of meeting halfway and doing something with the application design and programming aspects of FileMaker. I presented a full outline and the Wiley folks loved it.
By mid-2005 I had a publishing agreement and a beta release of FileMaker 8. To this day, many years after the 2006 release, this book is still highly ranked and is selling, even though FileMaker is up to version 18. Why? I don’t know the exact answers, but I’m assuming it is due to the content. It doesn’t just cover how to build an application in FileMaker. It covers the principles behind good database and application design and applies those to writing FileMaker applications. Plus it has a reference section for the scripting commands (programming statements), which is very similar to an API guide.
Here’s an example page from the book:
I’m very proud of this book and wish that I could convince someone to let me write another for the most recent version of FileMaker. It was a great experience and it opened a lot of doors for FileMaker development work. Unfortunately, in the software development industry, FileMaker is still not regarded as an application development tool. It is viewed as a very niche market, even though it has a very robust database server and the ability to produce a truly cross-platform application for Windows, Mac, iOS, and the Web. Recently, FileMaker Inc. has changed its name to Claris International and they are expanding into workflow automation and systems integration (Claris Connect) with other popular applications.
Feel free to give them a look for a single, true rapid application development platform for all devices. Claris.com